![]()
![]()
|
|
|
|
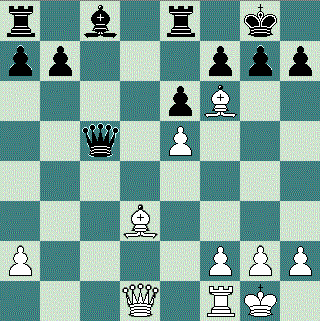
Question 3: Hi Doc! I don’t have a real problem to ask you, but I am very interested in getting your opinion of an idea of mine. Some of my friends have been spending time analyzing the famous game Dolmatov-Speelman (Hastings, 1989), in particular the position where white is to play his 18th move. (See Diagram1)
Diagram 1 I have studied Dolmatov’s notes from the 49th informator, as well as what was written about the whole game in one of Dvoretsky’s ‘bestsellers’. 1.Bxh7+ Kxh7 2.Qh5+ Kg8 3.Qg5 Qf8 [3...g6 4.Qh6 Qf8 5.Qh8#] 4.Rd1 b6 5.Rd4 Ba6 6.Rg4 Be2 7.Bxg7 [7.Qxg7+ Qxg7 8.Rxg7+ Kh8!; 7.f3 Bd3 8.Bxg7 Qc5+ 9.Kh1 Rac8; 7.Rg3 Red8 8.h3 Rd3 9.f3 Rd1+ 10.Kh2 Bd3 11.Bxg7 Qc5!] 7...Bxg4 8.Bxf8+ Kxf8 9.Qxg4 Rac8 10.h4 White eventually won I don’t feel satisfied with what I have read! White deserves more than the better ending that he got in the game (even if he did win it in eventually)! White’s position is almost overwhelming! His two bishops paralyze Black, and Black’s extra exchange seems too little without any development or activity what is the use of extra material? Can’t white try to win in the middlegame by maintaining the pressure with 18.Qg4!? ? (See diagram 2)
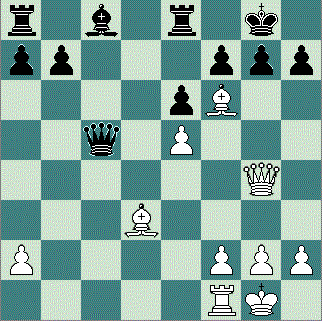
Diagram 2
With the variations that I give 1. ... Qf8 [1...g6 2.h4 A) 2...Bd7 3.h5 Qf8 (3...Re7 4.Qg5) 4.hxg6 fxg6 (4...hxg6 5.Qh4) 5.Bxg6 Re7; B) 2...Qf8 3.Bb5! Rd8 (3...Re7 4.Rd1) 4.Bxd8 Qxd8 5.Rd1 Qe7 6.Qg5 black is in big trouble; C) 2...h5 3.Qg5 Qf8 4.Bxg6] 2.Rd1! [2.Bb5 Rd8 3.Bxd8 Qxd8 4.Rd1!?] 2...Bd7 [2...Rd8 3.Bxh7+; 2...Kh8 3.Bb5! gxf6 (3...Re7 4.Qxg7+) 4.Bxe8 fxe5 (4...f5 5.Qg5; 4...Qxe8 5.exf6 Qg8 6.Rd8) 5.Bxf7 Qxf7 6.Rd8+] 3.Bxh7+ Kxh7 4.Qh5+ Kg8 5.Rd4 Qc5 what else is there? [5...Rac8 6.h3 Rc1+ 7.Kh2 mating] 6.Qg5 Qf8 7.Rh4 Rac8 8.h3 1–0it is clear that white is going to decide the game much faster than in the actual game! What am I missing? Paul
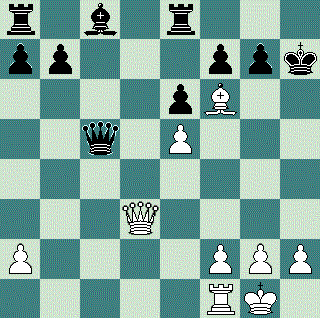
'Doc' answers: Paul! I am very well acquainted with the Dolmatov-Speelman game from Hastings ‘89—I was also participating in the tournament! A very interesting position...maybe one of the most interesting of the entire tournament. Your analysis looks very reasonable. There is no doubt that black is suffering bigtime! In the notes in the Dvoretsky book Dolmatov tries to present the ‘human side’ of the game. He is quite honest: he was not sure if he was winning or drawing and was just trying to do his best! Dolmatov chose the variation leading to a winning ending because that was the best he could see at the time over the board. What is the truth of the position? (After all, the game was played a long time ago and ‘practical’ considerations such as the clock and the emotion of the moment should be put aside.) I agree with you that white has a crushing position! White should be able to do better than the ending! Your 18.Qg4 is very strong, and (without wanting to get into a very exhaustive analysis of all of the defensive posibilities at black’s disposal) I am sure it wins faster than Dolmatov’s solution . However, Dolmatov’s first move (18.Bxh7ch) is probably the best move! Where he went wrong is on the next move: he should have played 19. Qd3 ch !!. White would then win even faster than in your clever solution! (See Diagram 3)
Diagram 3
I actually pointed this easier way to win in my article on the Hastings tournament published early in ’90 in NIC magazine. The idea of this finesse is to put the Queen behind the rook , instead of in front of the rook--as happened in the game. 1...Kg8 [1...g6?? 2.Qh3+ Kg8 3.Qh8#; 1...Kh8 2.Qh3+ Kg8 3.Qg3] 2.Qg3 Qf8 [2...g6 3.Qh4] 3.Rd1! As in the game, but this time the Rook and Queen battery will be much more powerful! 3...Bd7 [3...b6 4.Rd4 Ba6 5.Rg4 g6 (5...Be2 6.Rxg7+ the first difference from the actual game) 6.Rxg6+!; 3...g6 4.Qh4 Qg7 5.Bxg7 Kxg7 6.Qf6+ Kg8 7.Rd3 is certainly no improvement!] 4.Rd4 Rac8 [4...Rec8 5.h3 Be8 (5...Rc1+ 6.Kh2 Bc6 7.Rg4; 5...Rc3 6.Qxc3 Qc8 7.Qg3 Qc1+ 8.Kh2 Qh6 9.Rg4) 6.Rg4 g6 7.Qh4] 5.h3! This little move seems to be the key in many lines.Now there is no defence to white's attack 5...Rc3 6.Qxc3 gxf6 now white can win as he chooses... 7.Qg3+ Kh7 [7...Qg7 8.Rg4 Qxg4 9.Qxg4+ Kh7 10.exf6] 8.Rh4+ Qh6 9.exf6 However, it seems that both Dolmatov and Dvoretsky overlooked it. Best of luck! 'Doc'
|
|
|